Matt and I are going on a “One Year Anniversary
Vacation.” We’re heading to the Bahamas,
and I thought I should make something wonderful to take along with me. I keep thinking a bag, but that’s not all
that unique and I wanted to make something special. I set my mind on a travel wallet while
perusing Pinterest. I was so excited to
make it that I got right to finding the most adorable fabric I could find. See the pictures and directions below to make
your own. Also, check out this link http://www.spotlight.com.au/inspiration/projects/Travel-wallet/ to see how this lady made hers. She had her measurements in metric, I converted them (as closely as possible) to
U.S. Standard.

Step 1: Gather
your supplies. You will need the list
below to complete this project.
· 13x11”
piece of Fabric “A”
· 2
– 9x11” pieces of Fabric “A”
· 13x11”
piece of Fabric “B”
· 7x6”
piece of “Fabric “B”
· 8x7”
piece of Fabric “B”
· 16.5x3.5”
piece of Fabric “C”
· 6.75x2.75”
piece of Fabric “C”
· 2
– 13x11” pieces of fusible interfacing
· 2
– 4.5x11” pieces of fusible interfacing
· 3.5x6”
piece of fusible interfacing
· 4x7”
piece of fusible interfacing
· 2
buttons
· Coordinating
thread

Step 2: Prep
the fabric big fabric pieces. Each or
your 13x11” fabric pieces must have the fusible interfacing attached to give it
stability. I did not have fusible
interfacing, so I used some thin fusible webbing with a piece of embroidery
stabilizer to create interfacing.


Step 3: Prep
your pockets. Fold your 9x11” pieces in
half, right sides facing to create a 4.5x11” piece. Fuse your 4.5x11 pieces of interfacing to one
side of the fabric.


Fold your 8x7” fabric, right sides facing into a 4x7”
piece and fuse your 4x7” interfacing to one side of the fabric.

Fold your 7x6”
fabric, right sides facing, into a 3.5x6” piece and fuse the 3.5x6” interfacing
to one side of the fabric.
Step 4: Sew
the pockets. Sew along one short side
and both long sides of one of the 4.5x11” pockets. Flip to facing right side out. Top stitch along one long end of the pocket.

Fold the fabric down to a triangle on the other
4.5x11” pockets. Stitch around both long
ends and the folded triangle.

Cut the excess triangle fabric off to reduce bulk and
flip right side out. Stitch along the
uneven edge and down the side using a top stitch.

Stitch along both long edges and one short edge of
the 4x7” piece and flip right side out.
Top stitch one long edge.
Stitch along both long edges and one short edge of
3.5x6” piece. Flip right side out and
fold under open edge. Top stitch to
close of seam, continuing around the entire rectangle.
Step 5: Make
the coin purse. Fold your 16.5x3.5”
piece in half lengthwise with right sides facing. Stitch along both long ends and one short end. Flip right side. Fold one edge upward 3” and top stitch around
entire rectangle, creating a pouch. Fold
top edge down and iron to create a flap.

Step 6: Create
closure strap. Using your 6.75x2.75”
piece, fold lengthwise with right side facing and stitch around both long ends
and one short end. Flip right side
out. Fold short open ends under and
stitch using a topstitch to secure the seam and create a pretty edge around the
entire rectangle.

Step 7: Create
buttonholes. Using your buttonhole foot,
measure your button and mark where you want the button hole to go.


We want the buttonholes on the flap of the
coin purse and on one edge of the closure strap.

Once the hole is stitched, slit down the
center of the stitching to create and opening.

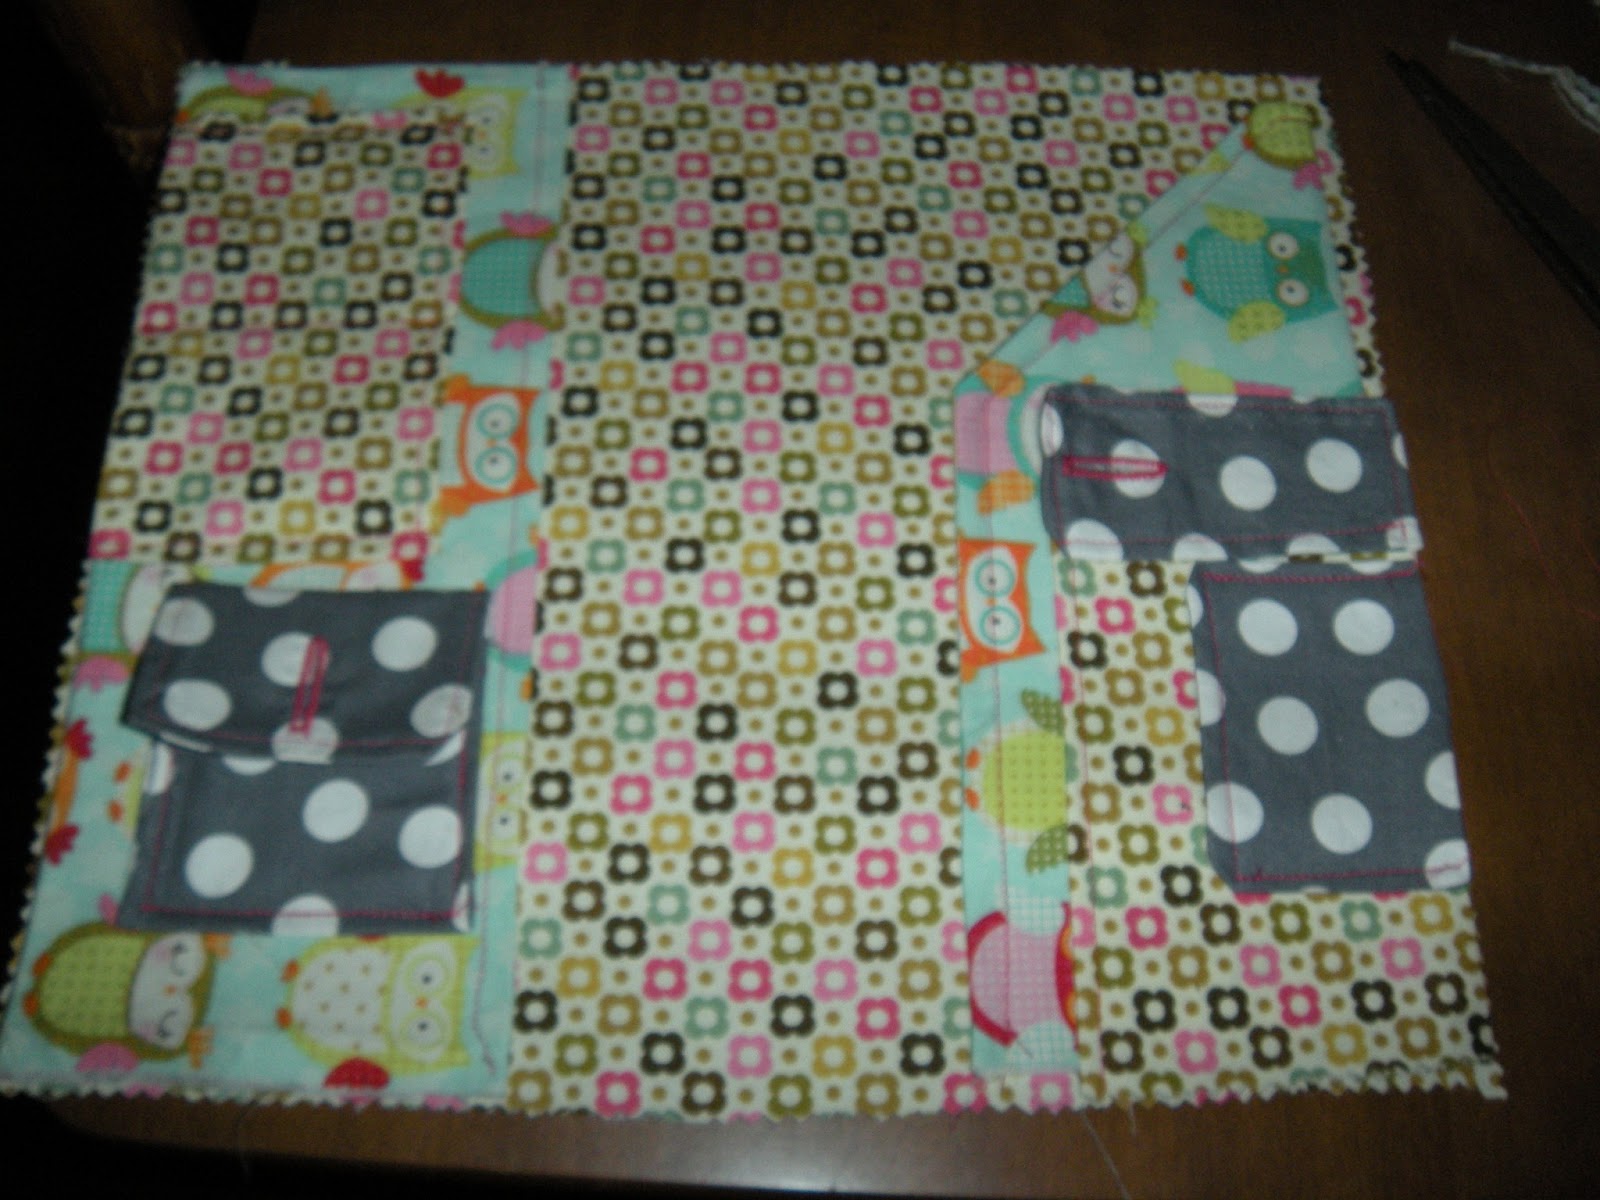
Step 8:
Assemble your pockets. On the
long 4.5x11” rectangular pocket, attach
your 3.5x 6” piece using a top stitch along both short ends and then halfway
between the two stitches you just made.
Your credit cards will go in these slots.


Below the credit card slots, attach your coin
purse along the top stitched edges you have already created. Be sure not to stitch down the flap of the
coin purse.

Attach your 4x7” pocket to the other long pocket,
stitching down both short sides.

I
added another small credit card pocket to the top of the passport pocket,
definitely do this if you don’t think you’ll have enough storage. I plan on putting my I.D. here.
Step 9:
Assemble the wallet. On your
inner fabric, Place pockets on each end.
Place the strap on the right side, facing in toward the center of the
fabric.
Add the outside fabric to the
top of the inside, right sides facing.

Use
barrettes or pins to hold pieces securely.

Stitch around the entire edge, leaving a 3” opening.

Flip the wallet right side out. Iron it flat, then top stitch about .25 - .5
inches from the edge or the fabric.
Step 10: Finish
it up. I decided to make a pretty little
stitch down the center of the wallet.
Since I used adorable owl print, I used a decorative stitch that looked
like little birdy foot prints.

You’ll
also need to add your buttons. The
button should be attached to your coin purse and to the outside of the
wallet.


Once this is down, look back and
admire your work. Also, enjoy your
travels!!!

This is SOO cute!!
ReplyDelete