What It's About

This is just a spot for me to put up new ideas, new creations, and little observations from my daily life.

Sunday, April 7, 2013

Soft Lunch Box Tutorial


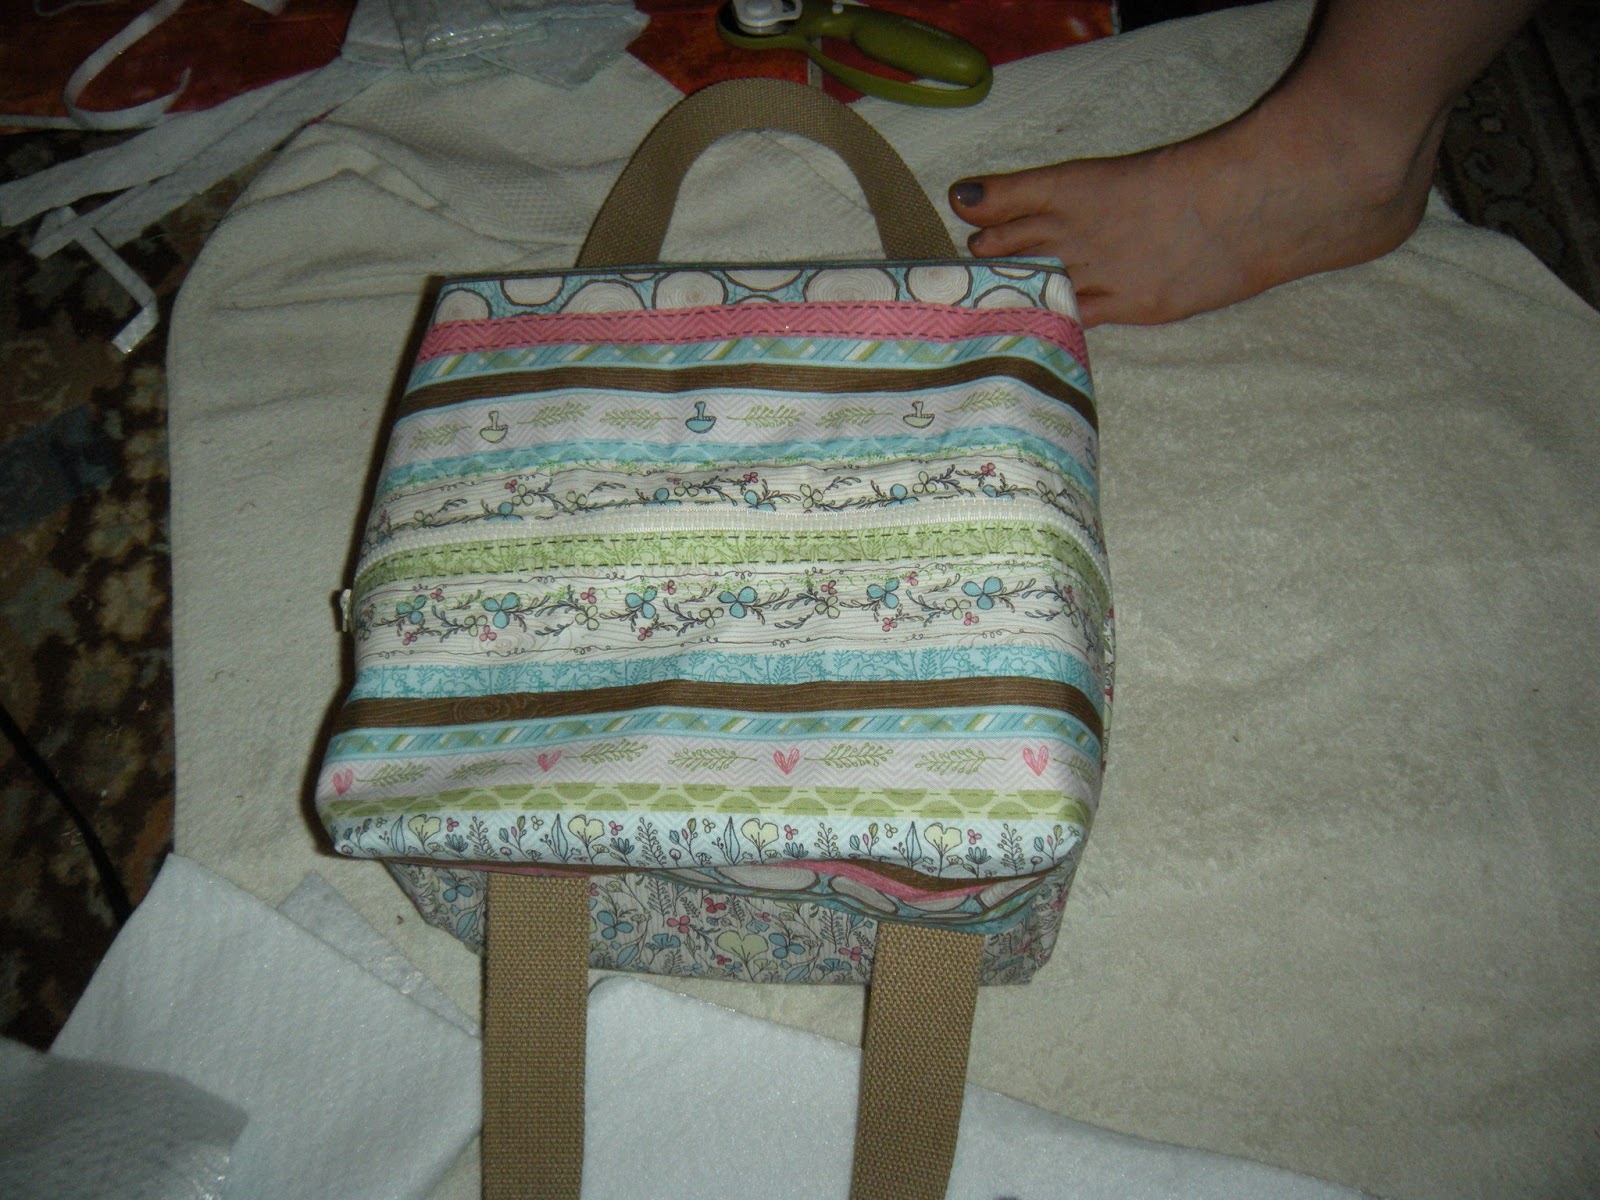
Since I no longer live five minutes away from my place of work, I now need a lunch box to transport nourishment for the various snacks and lunch I consume throughout the day.  I have this “problem” now when I walk throughout a store looking for something I need or want.  I no longer just grab the item and buy it, I have this though that runs through my head “I can make that!”  Obviously, I don’t think this thought is a bad thing, it just helps to boost my creativity and skill.  Not to mention, I did just buy an entire yard of iron-on vinyl and need a way to use it.


I pinned what I thought would be an awesome tutorial, but ended up slightly confused being as it is in a language I cannot read and Google did not translate.  After an hour or so of staring at this thing from top to bottom, I finally figured it out!  I’ll go ahead and describe what exactly I did with the picture tutorial I used.

Step 1:  Gather supplies. 
1.       You will need a 16x16 piece of iron-on vinyl and 2 8x16 pieces of vinyl
2.     A 16x16 piece of fabric and 2 8x16 pieces of the same fabric (this will be used for the inside),
3.     2 8x16 pieces of a coordinating fabric (for the top of the outside)
4.    Another piece of coordinating fabric cut to about 16x16” (for the bottom of the outside)
5.      A 16” sports zipper
6.     Coordinating thread
7.     2 7.5x16” pieces of medium-weight interfacing, and a 16x16” piece of medium-weight interfacing
8.     2 7.5x16” pieces of insulated batting, a 16x16” piece of insulated batting
9.    2 21” lengths of material for a handle
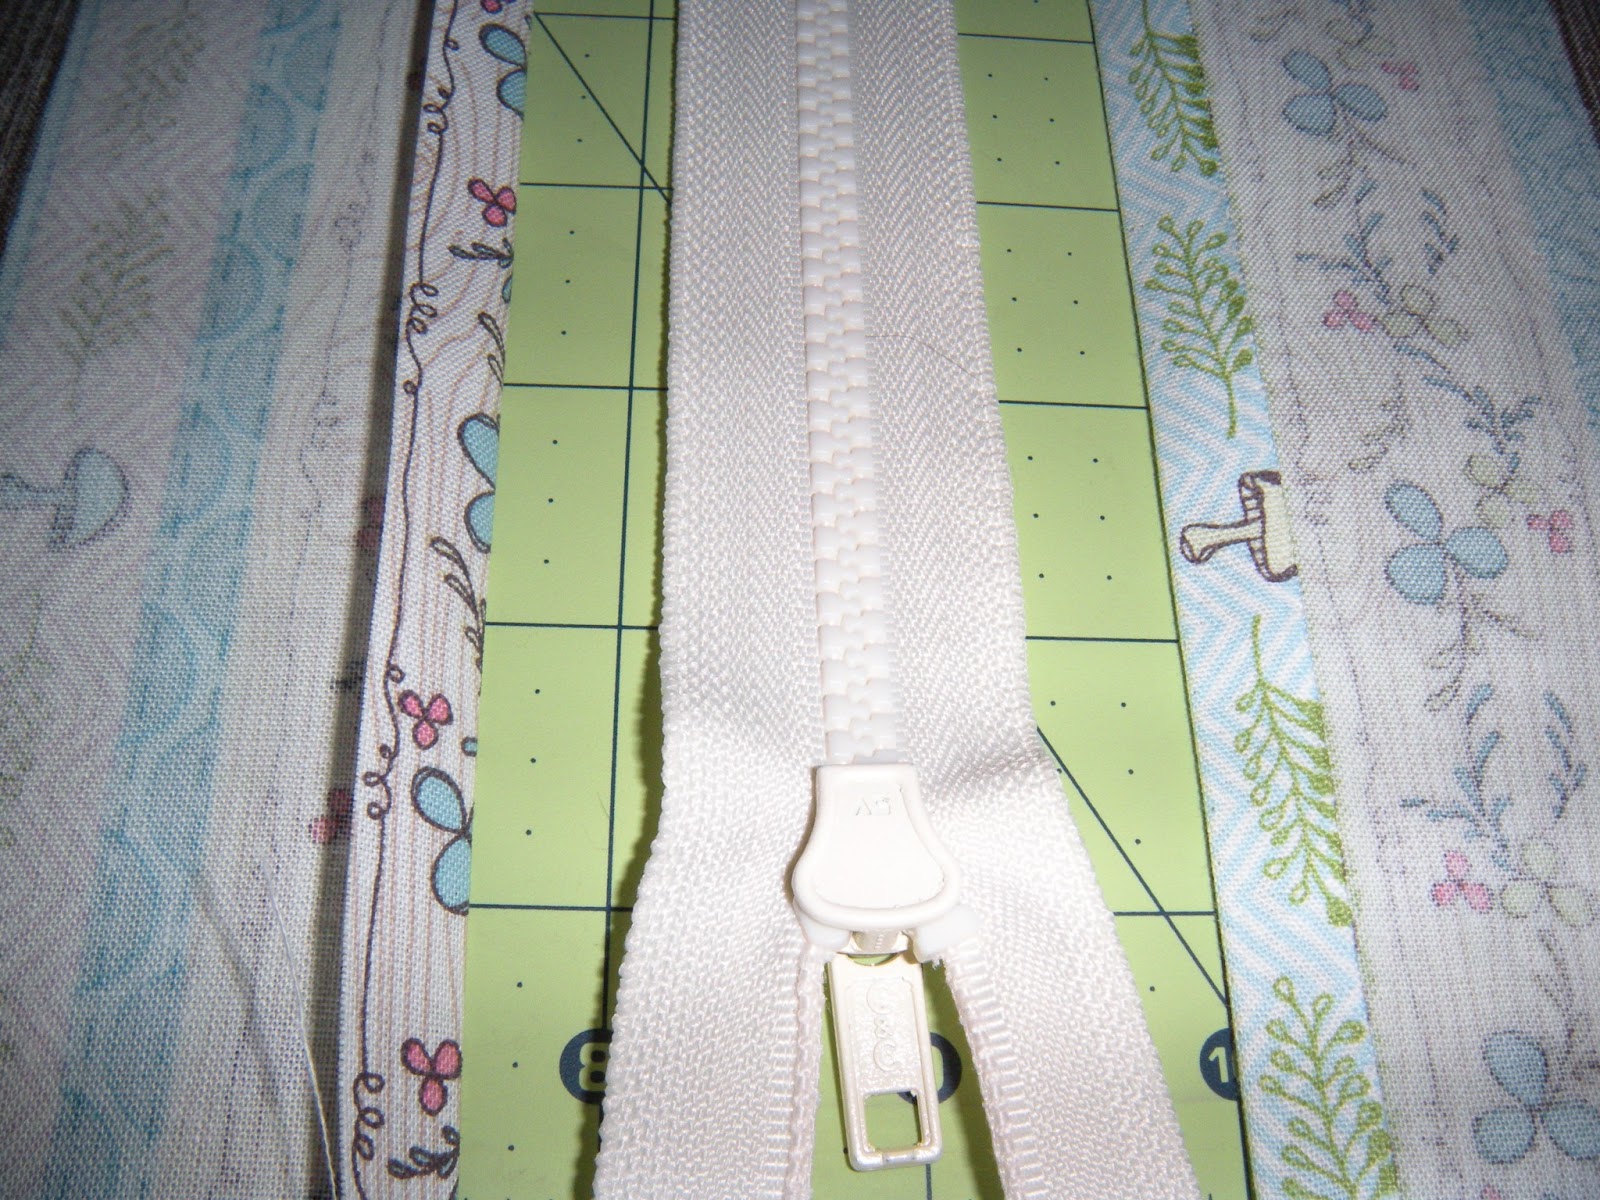

Step 2:  Sew on the zipper.  Using both pieces of the 8x16 outside top fabric, iron down top edge ½ inch.  Insert interfacing under the fold in fabric.  Pin zipper onto one side and sew on.  Pin zipper to other side and sew down.

Step 3:  Add handles.  Using the 16x16 piece of fabric for the outside of the lunch box and the 16x16 piece of interfacing and the 16x16 piece of insulated batting, layer the batting, shiny side out, interfacing then the fabric, then add the handles, loops facing inward.  Sew around entire square of fabric, securing the handles as you go

Step 4:  Add insulated batting to the top.  Add the batting to the fabric with the shiny side facing you.  Stitch down.  I used a pretty stitch at the top edge (near the zipper) just to showcase the thread I used and the awesome decorative stitches my machine is capable of stitching.

Step 5:  Attach the top and bottom.  Layer the bottom and top pieces, right sides facing.  Stitch around the entire edge.

Step 6:  Create the outside.  Cut 4x4” squares out of all four edges.  Pinch the edges together with seams touching.  Sew all four edges shut.

Step 7:  Iron on vinyl and create inside.  Iron vinyl pieces to inner lining using instructions on the packaging.  Follow the above steps to create the inside.  Flip the inner lining right side out and add it to the outside by inserting the outside of the bag into the inside of the bag.  Stitch the opening of the outside to the zipper of the top.

Step 8:  Flip it out.  Unzip the zipper and flip the bag right-side out, pressing out on all edges to create your box.  

Enjoy your creation.


Boxy Make-Up Bag Tutorial and Project


            I noticed while I was packing my stuff that all of the make-up bags I own are absolutely ridden with the leftovers of make-up past.  I tried washing them, but the stains remained.  It made me think, “Maybe I need a new make-up bag.”  Which led me to then think “I need a make-up bag I can clean and keep pretty-looking.” 

            While on Pinterest (of course) I came across a tutorial for a box-bag.  I thought it would make the most wonderful makeup bag.  Now to solve the next problem, how to make it easily cleaned.  While I was looking through clearance fabric, I spotted some iron-on vinyl.  A yard of the stuff was $3.  Let me tell you, this stuff is magic!  It irons on beautifully and creates an easily cleaned fabric that’s so much more adorable than the oil cloth they sell by the yard.  For me, a makeup bag that looks like it was made out of a picnic table cloth is just not appealing.

            Now, on to the good stuff.  I liked the tutorial I used, but I did tweak it a little. 


Obviously I ironed the vinyl onto the fabric for the inner lining in order to keep it stain-free.  

I copied the tutorial exactly for the zipper attachment.  

I found it easier to use the method I used for both the sewing machine cover and the basket liner to make the bag itself.  You can reference either of those if you would like, or you can copy the tutorial I referenced above.

I have plans to make a make-up brush holder and roll that coordinates with the fabric I used to make the bag itself.  Keep an eye out for the upcoming tutorial! 

Casserole Dish Holder Project & Tutorial


            Lately, I’ve been mesmerized by adorable casserole dish carriers I’ve been noticing on Pinterest.  I finally decided to suck it up and make a few.  I have been making them for friends’ wedding gifts.  Along with the casserole dish carrier, I’ve been etching a casserole dish with their new last name (see my glass etching tutorial for the full process).  After making a few for my friends, I figured why not make one for myself.  I used this tutorial: 


            Here are the supplies I chose to use.


There are a few changes I made.  For example, my Pyrex baking dish has handles, so I had to increase the size of the rectangles to 40 X 12 and 37 X 15. 

I also used buttons on the outer layer instead of Velcro.  I did this by folding a thin hair-tie in half and zig-zag stitching across it.  I then cut it in half, giving me 2 loops.  On the shorter side of the outer piece, I left it un-sewn and flipped it right-side out.  I then folded the edges under and pinned the loops 3 inches from each edge and sewed the edge shut.  I added the buttons to the opposite side of the loops to secure the holder shut.

From the pictures you can tell I have yet to sew on the handles, but I will be using an old belt instead of excess fabric.  We were getting rid of clothes we no longer wear and being the recylcler/reuser I am, I wanted to use Matt’s old belts instead of just throw them out.  I hope you love the tutorial as much as I did and I hope my extra tips helped you.

Little Baby Bib


          I know I have been slacking when it’s come to the tutorials/projects lately, but I’m about to throw all of what I’ve been doing lately out there at once.  Not to make excuses… actually, to make an excuse, we’ve been busy moving.  I slowed down on the amount of crafts I’ve been making, but there are quite a few wonderful creations for you to check out and maybe make for yourself.  Just stay tuned to see the products of my creativity.

           My niece just turned 1 year old a couple of weeks ago.  Wanting to give her something hand-crafted, I set out on a nearly impossible journey. What in the world do you make a one year old for their birthday?  Matt’s mom gave me the most wonderful book to flip through.  There were lots of great appliqué projects.  I wanted to try a few just to learn how to do appliqué.  After all, the sewing machine Matt got me for Christmas has some really awesome stitches, making it great for appliqué.  I decided upon a bib and Matt chose the lion we placed on it.  In a hurry to complete the project, I failed to get a final- product picture, but I’ll show you the process anyway.


Step 1:  Gather your gear.  You will need a washcloth or some terry-cloth, small scraps of fabric, tear-away embroidery stabilizer, coordinating thread, a fabric marker, and Velcro.

Step 2:  Choose your project.  I chose the bib project from Quilts, Bibs, Blankies… Oh My! by Kim Schaefer. 

Step 3:  Cut out your fabric.  Using the template provided within the book, cut out the bib shape first.  I folded the washcloth in half and taped the template to the cloth, then cut around it.  


Follow this same process with each appliqué piece until all are cut out.

Step 4:  Assemble.  Assemble your fabric to make sure everything is cut out in the proper size.

Step 5:  Begin the appliqué process.  Layer a square of embroidery stabilizer under your appliqué pieces.  I also did one with a frog on it.

Place the first piece of the design down and silk-stitch around the edges, being sure to turn the fabric when necessary.


Step 6:  Applique.  Layer each piece until all pieces are compiled.

Now, tear away the embroidery stabilizer.

Step 7:  Use your fabric marker.  Draw on features too small to appliqué.  I had to draw on whiskers, eyes and eyebrows to my adorable little lion.

Step 8:  Attach a cute backing.  I had some left-over flannel, so I added an extra layer on the back of the bib to be ultra-comfy for Audri. 

Step 9:  Bind it.  Sew your binding around the edges to finish off the bib.

Step 10:  Add the Velcro.  I added the Velcro to the top edge of the bib and the edge of the binding in order to make the bib adjustable. 

The finished product was so cute, I just loved it!  I can’t wait to make more projects from this amazing book.

Monday, March 4, 2013

Finally finished!


            I have taken my sweet time getting my first crocheted blanket finished.  After I finished, I have found things I could do better, but for the most part, I’m so happy with the end product.  I used a double stitch for the entire blanket (I could not tell you the gauge or the number in the chain).  I’m still learning all the terms and processes in crocheting, so I just went for it.  I found an amazing video tutorial when I got to the point where I wanted to finish up the edges evenly.  Follow the link below to access her video.


This lady is awesome!  She breaks things down simply and in a way that makes so much sense.  I used a half-double stitch for the edge like she shows in the video tutorial.  I made sure to go around the blanket four times with the half-double stitch, giving myself about an inch of edging at a different stitch.  I’m so happy with how the edge turned out.

            I’m sure many of you have tried to get warm under a crocheted blanket.  It’s very drafty due to all the tiny little holes that give the blankets their beauty.  Since this blanket was to be given to a baby, I wanted it to be warm and useful.  I didn’t want it to be used as just a throw.  With that being said, I grabbed some super-cozy flannel fabric at Joann’s.  It was on sale a couple of weeks ago for just $2.60 per yard.  All I needed for this product was one yard (not even that once I cut it down).  My blanket ended up being 32” x 32” once it was finished.  I cut my flannel to 34” x 34”.  Once it was cut, I folded it under a quarter of an inch, then ironed it.  Next, I folded it under another ¾ inch and ironed again.  I laid the crocheted blanket down next and pinned the edges to the edges of the flannel.  

            Using a zig-zag stitch, I went around the entire edge of the blanket.  Next I went around the area where I began the edge crocheting (about an inch in) and zig-zag stitched around the entire blanket there.  In order to ensure that the crocheted blanket did not separate from the flannel, I made an “X” from one corner to the other corner on both sides.  I’m glad I made this project.  IT was one of the most time consuming projects I’ve ever worked on, but I learned a lot from it.  I hope if you try it you love it too.  The next time I crochet, I’ll try to get more into the technical terms so that I can make a tutorial.  Keep your eyes out for more!!!