I don’t know when it entered my mind, probably the
moment I opened my sewing machine, but I was set that I would make a quilt for
my Godson and another for my 2 year old cousin.
After less than 2 months with my wonderful sewing machine I can say that
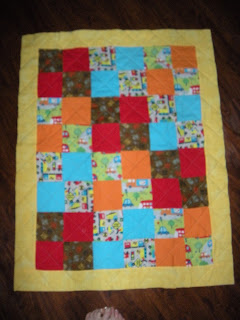
I have kind of successfully finished my first quilt. There are some uneven squares due to my lack
of proper tools. Regardless of the
imperfections of my quilt, I feel satisfied with it and a quite proud of the
finished product. I’ll be putting up
another tutorial with my second quilt once it is finished as well. Check out the tutorial below for how I did my
first quilt. You’ll notice there is
advice and changes I would make if I were doing this over (and I am). I hope you enjoy it and get a wonderfully beautiful
quilt you can be proud of as well.
Step 1. Choose
your size. I decided on a crib-sized
quilt since I was making the quilt for a 2 year old.
Step 2. Choose
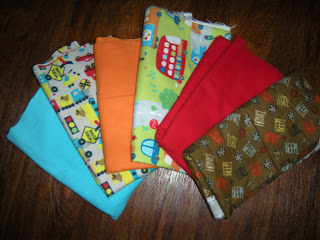
your fabric. You will need 6 colors for
the center of your quilt. I chose 3
prints and 3 solids and asked for a quarter-yard of each. Next I chose a coordinating color for the
edging and another color for the backing.
You will need about a quarter yard for the edging and a yard and a half
for the backing. Finally, you’ll need
fabric for the binding. I got a quarter
yard (this was enough for 2 quilts). The
binding fabric also was a coordinating stripe pattern that was just adorable.
Step 3. Gather
your supplies. A word of advice, you
most definitely need supplies that are proper for the work you are doing. Later in the process I got the proper
supplies, but I wish I would have invested sooner. You will need a large self healing mat, a
rotary cutter, a see-through yard stick or large ruler, an iron, pins, a
quilting needle (for your sewing machine) a GOOD thread, quilting thread, and
of course, your sewing machine.
Step 4.
Measure. I measured the center of
my quilt first. I cut my squares to 5.5
inches each.
If you are making a quilt
like mine, you will need 8 squares of each fabric you chose for the center of
your quilt. Cut these using your rotary
cutter and your long ruler on your self-healing mat.
Step 5.
Iron. Iron all your little squares.
Step 6. Choose
a Pattern. I set my squares out in a
pattern prior to doing any sort of sewing.
Once I found a pattern I liked, I began pinning.
Step 7. Pin
it. Pin your lines using your pins one row
at a time.
Step 8. Sew the
rows. Use your good quality thread and a
standard needle at this point in your process.
Begin sewing one square to the next along your row until all are sewn
together. Remember to use a ¼ inch seam
allowance.
Step 9. Iron
again. Once all your rows are sewn, sew
the hems one way.
*Hint! Sewing toward the darker color will ensure
your hems run the same way, it makes it easier to sew.
Step 9. Pin
the rows together. Begin pinning the rows
you sewed together, making sure to line up your squares.
Step 10. Sew
the rows together. Sew your rows
together, slowing down when you go over each hem, you don’t want to break a
needle.
Step 11. Iron
it. Iron your seams down again.
Step 12. Cut
your edging. I folded my edging fabric
in half and then half once more. I cut
the edging into four inch wide strips. I
made sure to have 4 of these strips.
Step 13. Iron
it. Iron your edging
Step 14. Pin
the edging. Pin the right (or left) side
of the edging along the finished center of your quilt.
Step 15. Sew
it. Sew the edged to the side of your
quilt. Then repeat on the other
side. Finally, repeat the edging process
on the top and bottom of your quilt.
Step 16.
Iron. Iron your hems down yet
again.
Step 17.
Backing. Cut your backing so that
it is the same size as your quilt front.
Step 18.
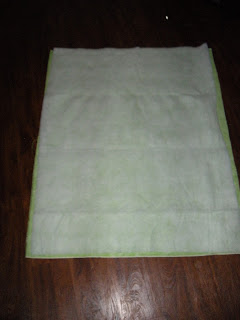
Batting. I chose fusible batting
for the quilt. I thought it would be
easier and would be sure not to move around.
I was right!
Step 19.
Layer. Lay down your backing
right side down.
Lay your batting on top
of that, then lay your quilt front face up.
Step 20. Iron
it together. Following the instructions
on your batting bag, iron your fabric to your batting. I started in the center and worked my way out
until everything was good and fused.
Step 21. Draw
on lines. I used a quilting ruler and
began drawing a pattern (mine was a simple square-diamond pattern) across the
front of my quilt. You can use a dressmaker’s
pen or just a regular pencil, so long as it’s washable.
Step 22. Begin quilting. Make sure your machine has been threaded with
your quilting thread and has a quilting needle all set up to sew. Now, following the lines you drew, begin
sewing. Do this slowly to avoid blunders
and make sure to go even more slowly over where squares meet. The fabric here is much thicker and if you
blow right through it you may break your needle. This part took the longest for me. Be patient and take your time. The results are worth it!
Step 23. Cut
the Binding. Iron the fabric you plan on
using for the binding. Fold it in half
and half once more. Cut 2 ½ inch strips
using your self-healing mat, rotary cutter, and quilters ruler.
Step 24. Iron
the binding. I folded the edges of the
binding into the center of the fabric and ironed it down.
Once this is done, fold the entire piece in
half and iron it down.
Step 25. Pin
the binding. Before pinning, even out your quilt. I used my rotary cutter, self-healing mat and quilting ruler to make sure all the edges were even before putting on the binding.
I sandwiched my binding
around the quilt and pinned it down.
Each side of the quilt should be layered with your binding.
Step 26. Sew
it. Going very slowly, begin sewing on
your binding. I’ll let you know, I was
lazy and instead of looking up how to sew binding I just went with it, no real
method whatsoever. I would recommend
looking up the best way to sew binding on your quilt rather than going with
what I did.
Step 27.
Admire. Now that you are all
finished, step back and marvel at your magnificent work! Be proud of what you have done.
I will be putting up another tutorial with my next
quilt. I have used different methods and
was well equipped with the proper supplies for the one I’m currently working
on. I hope what I have posted helped,
but keep in mind I have something better coming!


No comments:
Post a Comment