What It's About

This is just a spot for me to put up new ideas, new creations, and little observations from my daily life.

Wednesday, February 27, 2013

Easy Nightie Tutorial


           I’ve been seeing a lot of pins on Pinterest about how to make adorable little dresses and nightgowns for little girls out of pillowcases.  Since I don’t have a little girl to make on for, I decided why not make one for myself?  Turns out a pillow case would yield a teensie weensie little nightgown, maybe more of a nightie shirt.  Turns out, pillowcases are really just 2 rectangles sewn together, so why not just cut two larger rectangles out of an adorable fabric and make myself and cute little nightie?  This is exactly what I did.
            As always, my mistakes will be noted as well as other hints that may help you along.  Enjoy!

Step 1:  Gather your supplies.  You will need enough fabric to make yourself a nightgown (I used a little less than a yard), a rotary cutter or scissors, a self-healing mat, a ruler, coordinating thread, ribbon, accent lace.

Step 2:  Measure.  If you have nightgown you already love, grab it as a template for the width.  Be sure to add an extra inch to each side (2 inches total).  The height can be measured by starting at your collarbone and measuring to your desired length.  Add an extra 5 inches to this measurement for the hem and the top.

Step 3:  Cut your fabric.  Using the measurement from step 2, cut out your rectangle.  

Using your self-healing mat, ruler and rotary cutter or scissors, cut the top corner off at a 60 degree angle on both sides.

Step 4:  Iron and pin.  Iron your two pieces.  Place them right sides facing and pin along both sides from the just cut corner to the bottom.

Step 5:  Sew the sides.  Sew along both sides  ½ inch from the edge.

Step 6.  Prep the arm-holes.  Fold both sides of the 60 degree cut inward ½ inch, leaving the fabric right side out.  


Iron and pin this.  Sew each section ( a total of 4 ) using a zig-zag stitch.

Step 7.  Finish the top.  Fold down the top edge ½ inch and iron.  

Fold down another 2 ½ inches.  Iron and pin down this section.  Sew at both the top and bottom of your fold to make a “sleeve.”  You will insert your ribbon there.

Step 8.  Hem it.  Fold the bottom of the dress in ½ an inch and iron.  

Fold it in another 1 ½ inches, iron and pin.  

Using a top-stitch, sew along this edge.

Step 9.  Add the lace (if desired).  Flip your nightgown right side out.  Line the top of your lace to be even with the top stitch at the bottom of your nightgown.  Pin down the lace. 


Stitch along the top edge and the bottom edge of the lace, securing it to the gown.

Step 10.  Add the ribbon.  Cut a length of ribbon to act as the strap.  Using a safety pin, pull the ribbon through the top two sleeves so that one side of the gown has each ribbon end showing.

Step 11.  Make a bow.  Tie the ribbon into a pretty bow.  To secure this bow, stitch and “X” in the center of the bow.  

This will ensure the bow does not come undone.

Step 12.  Stand back and admire!!!

Friday, February 22, 2013

Yoga Mat Bag Tutorial


            After finding out both my Husband and I were accepted into Duke University’s Master’s program, I simply could not go to sleep.  I was much too excited.  What to do with all this excitable energy?  Sew, of course.  I grabbed a fabric I chose to create a purse with but haven’t got around to for this project.  Instead, I made a really adorable yoga bag.  Once I started sewing this bag, I couldn’t resist not using a decorative stitch.  I had yet to use them and my sewing machine has a plethora of beautiful stitches.  This would be the project to try them on.  I must say, I am very pleased with the look of the stitches and the ease with which my sewing machine makes them.  It really added a lot to this project.  Look below for a quick tutorial and improvements upon it.  Hope you enjoy!!!


Step 1.  Gather your materials.  You will need ½ yard of fabric, a rotary cutter (or scissors), coordinating thread, a quilting ruler, a self healing mat, an iron, and some pins.

Step 2.  Measure and cut.  You will need to fold your fabric in half lengthwise.  Measure 9.5-10  inches from the folded edge and cut the entire length.  This will give you the yoga bag part.  The leftover pieces will be your strap.

Step 3.  Cut the curve.  While your fabric is folded right-side in, cut a curve to be the bottom of the bag.


*I cut my curve away from the fold, be sure to cut yours toward the fold.  It will hide the seam near the strap this way.

Step 4.  Sew the bag.  Pin together your bag and stitch ¼ inch from the seam.

  Leaving the bag right side in, fold the fabric ¼ inch inward, then inward 1 inch, pin this shut. Use a top-stitch to create the hem of the bag.  


I used a leaf stitch from my decorative stitching options for the hem and it looked awesome!

Step 5.  Sew the strap.  Make sure your strap pieces are facing each other right side in.  Stitch ¼ inch from the seam on both long ends and one of the shorter ends. 

Flip the strap right side out.  Fold the open end inward and stitch it shut.  Fold the strap in half

then in half again.


Iron it down, pin it, and the top-stitch 1/4 inch from the seam around the entire strap.


*I used a star-shaped decorative stitch for this one.  Isn’t it pretty? *

Step 6.  Attach the strap to the bag.  Flip your bag right side out.  

Picking it up from the bottom, flatten it out at the seam.  


Pin one of the short ends of the strap to the pointed end of the bag.  

Stitch the strap to the bag, making sure to make it secure.  Next, attach the other end of the strap at the top-stitch of the hem of the bag.  

Make sure the stitch is secure. 

Step 7.  Admire.  Put your yoga mat in the bag and marvel at your creation.  I hope you love it!

Saturday, February 9, 2013

Homemade (No cooking necessary) Peanut Butter Fudge Pie


            I enjoy cooking (and baking) almost as much as I enjoy crafting.  Today I decided to make a favorite of Matt’s:  My Almost-Famous Peanut Butter Fudge Pie.  Anyone who’s tried the stuff has given me endless compliments and requested I make it again.  It’s one of the easiest recipes in the world and is so simple to make… in fact it doesn’t even require baking if you use a ready-crust.  I’ll post the recipe and pictures of how to make the pie for yourself, but first a little extra description.
This pie can be modified very easily.  I’ve made it with hand-whipped whipped cream, crumbled Reese’s crumbled on top, as well as with a homemade cookie crumb crust (also easy and I’ll post the recipe below for that too).  Feel free to modify as you like, but for the sake of simplicity, I put the easiest and quickest method below.


Step 1:  Measure out 1 cup of sugar and one package (8 oz) of cream cheese (softened) into a large mixing bowl.

Mix with a hand mixer on medium speed until well blended and fluffy.


Step 2:  Add ½ cup of creamy peanut butter to the cream cheese mixture. 

 Blend on medium with hand mixer until well combined and honey-colored.

Step 3:  Increase the speed on your hand mixer to medium high and add 1 tsp vanilla mixing until thoroughly combined.

Step 4:  Add ½ of a container of cool whip (or whipped cream, if you’re feeling froggy) and blend on medium-high speed until well blended.


Add the remaining cool whip and continue mixing on medium high until a light beige color is reached and everything is thoroughly combined.


Step 5:  Add the mixture to the pie crust.

Spread the mixture (it will be thick) all around the pie crust up to the edges.

Step 6:  Heat your hot fudge until liquid-like consistency is reached.  

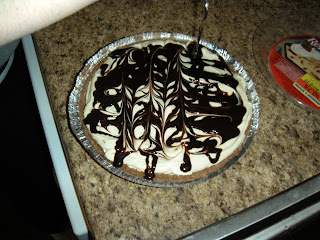
Using a knife to control the flow, drizzle the fudge across the pie in whatever pattern you desire.


Bonus!!!  If you want to make a pretty, marbled pie, just run a butter knife back and forth through the top layer of pie and fudge.  Then run the knife up and down.  If you want, add crumbled Reese’s cups to the top of this.


Step 7:  Refrigerate at least 2 hours, or until pie is firm.  Serve cold and enjoy!  

Check out below for a simple, easy to print version of the recipe as well as a recipe for a homemade crumb crust.

Peanut Butter Fudge Pie
Ingredients:
1 cup sugar
1 package (8 oz) cream cheese, softened
½ cup creamy peanut butter
1 tsp vanilla
1 container cool whip (or whipped cream)
Oreo or chocolate cookie crust
Hot Fudge Topping

Directions:
1.       With an electric mixer, mix together sugar and cream cheese on medium speed until fluffy.
2.     Add peanut butter and blend until honey-colored.
3.     Increase blender speed to medium-high and add vanilla, mixing well.
4.    Add whipped topping one half at a time and blend until creamy.
5.     Smooth filling into pie crust.
6.     Heat hot fudge then drizzle over pie filling.  Using a butter knife, swirl fudge back and forth and side to side to create marbling.
7.     Refrigerate at least 2 hours, or until firm.  Serve cold.


Cookie Crust

Ingredients:
30 Oreo cookies, or 10 chocolate graham crackers (finely crushed)
4-6 Tbsp butter, melted
1 Tbsp sugar (if using graham crackers)

Directions:
1.      Heat oven to 325o F.
2.     In a medium bowl, combine cookie crumbs and 4 Tbsp butter (and sugar if necessary).  Mix crumbs until moistened.  Add more butter if needed.
3.     Add crumbs to an 8” pie pan or dish.  Using your fingers, press crumbs into bottom of pan and up the sides so that no holes show.
4.    Bake crust 8-10 minutes.  Let crust cool completely.