What It's About

This is just a spot for me to put up new ideas, new creations, and little observations from my daily life.

Thursday, November 28, 2013

Dining Chair Upholstery - Tutorial

          Turkey day is a big day for me.  Being such, I like to have a house ready for company.  We love our apartment and we love our dining room table and chairs, but the upholstery didn’t quite match the rest of the décor, so I decided while everything was cooking I would reupholster our chairs.  It’s a super-easy process and the end result is something unique and wonderful.  I was lucky to have the help of my handsome and wonderful husband.  Check out our handy-work below.  And while you’re at it, try it for yourself!


What you need:
·       Canvas or another thick fabric
·       Scissors (I use pinking shears to minimize fray)
·       Staple gun and staples
·       Screwdriver
How you do it:
1.      Grab your chair.

2.     Flip it over and remove the screws from the base of the chair using your screwdriver (or drill if you’re a lucky duck).  The bottom of the chair should pop right off.  Remove the fabric already existing on the bottom.  Keep one of these pieces.

3.     Quickly inventory your chair bottom.  Mine had a base with screw holes (obviously) and 2 pieces of foam cushion.  Measure the height of your cushion and base. 


Measure the width and length.  Using these dimensions, cut your fabric to the dimensions you need.  All chairs are different, so you may need something different than I do.  Keep in mind you may not need to measure if you’re able to salvage a piece from one of the old upholstered pieces.  You can use this as a template for size.

4.    Lay the fabric on the ground face down.  Next lie your seat bottom, cushion down on top of this.

5.     Starting with one side, tightly pull the fabric over the edge and staple along the fabric edge.  Do this to the opposite side.

6.     Staple the fabric along the edge of the base.

7.     Fold the fabric over like you would wrap a present and staple this down.  Repeat on the left and right of the side you are working on.

8.     Fold the excess fabric up and finish stapling.  Repeat these steps on each chair.


9.    Put the base of the chair back on the chair and reattach it with the screws removed.  Double check for stability, then enjoy your quick, easy, beautiful work.

Chicken & Gnocchi Soup - Recipe & Tutorial

          A big favorite soup in our home is Chicken and Gnocchi.  It’s rich, filling, and all around delicious.  I thought since it is Thanksgiving and there will be leftover turkey galore that I should bring to you a recipe to take up some of the oodles of turkey from your Thanksgiving dinner.  The recipe is written with chicken, but just substitute your turkey for the chicken and you should have a delicious, warming meal.  So gather around your stove and be thankful that you are about to eat a meal that could just change your life!

What you need:
·       2 cups of diced, cooked chicken
·       4 Tablespoons butter
·       2 cloves garlic, minced
·       ¼ cup onion, diced
·       ½ cup flour
·       Salt and pepper to taste
·       2 cups of cream
·       1 can chicken broth (or stock... or drippings from your turkey to make this festive)
·       3-4 cups of milk (depending upon fat percentage and personal preference of thickness)
·       1 carrot, shredded
·       1 celery stalk, shredded
·       2 cups spinach, shredded
·       ¼ cup basil, shredded
·       1 package Gnocchi

How you make it:

1.      Brown chicken in melted butter.  Add garlic and onion and sauté.


2.     Once chicken is browned, slowly add flour (you may not need to use it all), salt and pepper, until it is thoroughly mixed with butter and coats chicken.  Slightly brown this mixture, making sure not to burn it.

3.     Once browned, stir in cream slowly until thoroughly combined with chicken and flour mixture.

4.    Add broth and continue mixing.

5.     Add milk to desired thickness.  Keep your milk around as the mixture cooks to thin out the soup in case it becomes too thick for your preference.

6.     Add carrots and celery.  Bring soup to a boil for a couple of minutes, then down to a simmer for about 15 minutes.

7.     Once soup has reached desired thickness, add spinach and basil, followed by the gnocchi.  Bring up the heat to medium once more.  Cook for another 5-10 minutes, covered.

8.     Serve with salad and breadsticks for a simple, delicious, hearty meal.

9.    Enjoy!!!

Thursday, October 31, 2013

Homemade Apple Crisp - Recipe and Tutorial

          Now that it finally feels like fall in North Carolina, I decided to make one of my fall favorites… Apple Crisp.  There’s something about walking in to the smell of apples and cinnamon that just screams “Autumn!”  This recipe is not only easy, it’s delicious and sure to become one of your (or your family’s) favorites.  So get yourself to the farmers market, the orchard, or (if you’re like me) the grocery store to pick up some beautifully ripened apples to start this fall fave!
 

What you’ll need:

For the “filling”
·       5 medium apples *** I like using granny smith, one, because they are a late season apple, and two for their crispy tartness***
·       ¾ tsp ground cinnamon
·       ¼ cup brown sugar, lightly packed
·       1/3 cup butter, melted

For the “topping
*** By the way, I double the topping recipe because I absolutely love the extra crispiness.  Feel free to cut the ingredients below in half if you’d prefer a less crisp Apple Crisp***

·       1 ½ cup brown sugar, lightly packed
·       1 ½ tsp ground cinnamon
·       2/3 cup butter, melted
·       ¾ cup all-purpose flour
·       ¾ to 1 cup old-fashioned oats


                            *ignore the vanilla, I decided last-second to omit it

How to make it:
1.      Preheat your oven to 375o F.  Grease an 8” or 9” square or round glass baking dish.
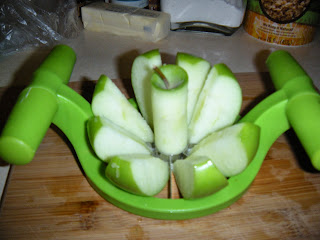
2.     Core and slice your apples.  

      We have an awesome corer/slicer that is super fun to use for this part.  
Look at my handsome helper.  What an amazing husband!

      We also “skin” our apples and slice the apple slices even thinner to about ½ inch slivers.

3.     In a large mixing bowl, combine the cinnamon, brown sugar, and butter until well mixed.  
      

      Add the apples to this mixture and stir them up until they are lightly coated in the buttery sugary goodness. 
      

      Transfer them to the greased baking dish.

4.    Using the same bowl (for dishes and your sanity’s sake), mix together the brown sugar, butter and cinnamon for the topping until well combined.  Add the flour and ¾ cup of the oats.  Mix together until well blended.  If the mixture is too thin, add the rest of the oats.
      

5.     Spoon the topping over the apples evenly.

6.     Place the baking dish (apples and all) to the preheated oven and bake for 30-35 minutes or until topping is golden brown and cooked throughout and apples are tender.

7.     Serve the apple crisp, once cooled slightly with vanilla bean ice cream.  Or not, serve it cold, sans à la mode, or with whatever it is you enjoy.


*** Great tip:  Apple Crisp makes great breakfast.  And don’t you feel guilty about it, after all, there’s healthy apples and oatmeal.  Don’t you eat those for breakfast anyway???

Sunday, October 27, 2013

Homemade Chocolate Chip Cookies - Recipe & Tutorial

          When weather gets colder, heating up the oven is my favorite thing to do.  Baking is such a stress relief, especially when it’s a recipe everyone knows and loves.  So, when my husband requested my homemade chocolate chip cookies I couldn’t turn him down.  This recipe is just wonderful.  You get a slightly crisp outside and the gooiest, chewiest, most delicious, chocolaty center.  And while it’s not recommended to eat, the cookie dough is to die for!  Now it’s your turn, heat up that oven, pull out the mixer and get to baking!  I promise this going to be one of your favorite recipes.


What you need:
1 cup (2 sticks) butter, softened
¾ cup granulated sugar
¾ cup light brown sugar, packed
1 tsp vanilla extract
2 eggs
2 ¼ cup flour
1 tsp baking soda
¼ tsp salt
1 package (11.5 oz) semi-sweet chocolate chips


Directions:
1.       Preheat your oven to 350oF.
2.     Beat the butter, sugar, brown sugar, and vanilla in a large bowl with a hand mixer until creamy.  Add the eggs and beat well. 

            *** An update (or side-note):  I've been asked why I use equal parts brown sugar and granulated sugar.  The reason for this is that it helps keep the cookies moist.  Most recipes call for 1 cup granulated sugar with 1/2 cup brown sugar.  You can use this if you are someone who likes a more crisp cookie.

3.     In a separate bowl, combine flour, baking soda, and salt.  Don’t worry about sifting the flour.  I always sift for cakes and breads, but not for cookies.  This works for me, but if you must sift, sift to your heart’s content.

4.    Slowly add the flour to the egg and sugar mixture, beating with a hand mixer.  Beat until well blended.

5.     Fold in chocolate chips.
6.     Drop cookies by the tablespoonful (or larger) onto a greased cookie sheet.  Bake for 8-10 minutes or until edges begin to look golden brown.
             *** Another note:  I used two different types of pans, the dark nonstick in the picture below and a shiny aluminum pan.  The dark nonstick yielded fluffier, thicker cookies while the aluminum pan made thinner, more largely spread cookies.

7.     Let cool for a couple of minutes on the cookie sheet then transfer to cooling rack until entirely cool.
8.     Store cookies in an airtight container.  This will help keep the cookies moist and delicious. 
9.   As always, enjoy!